Introduction to Paper Poinsettia Craft
History of Poinsettia
Originating from the region of southern Mexico, the poinsettia plant carries a rich historical tapestry. Known locally as "Flor de Noche Buena" or Christmas Eve Flower, the vibrant red plant was initially cultivated by the Aztecs, who used it for both medicinal purposes and as a dye. Its introduction to the United States can be credited to Joel Roberts Poinsett, the first U.S. Ambassador to Mexico, who brought the plant back in the 1820s. Over time, the poinsettia has become deeply embedded in holiday traditions, symbolizing joy and celebration.
Significance in Christmas Decor
The poinsettia's association with Christmas decor can be traced back to a Mexican legend about a young girl who, unable to afford a gift for Jesus, picked humble weeds from the side of the road. When placed at the church altar, the weeds miraculously transformed into vibrant red poinsettias. This story has solidified the plant's role in holiday decorations. Today, its star-shaped leaf pattern is seen as a symbol of the Star of Bethlehem, and its red color echoes the blood sacrifice of Jesus. This deep-rooted symbolism makes the poinsettia a perennial favorite in Christmas decor around the world.
Popularity of Paper Crafts
Paper crafts have surged in popularity, driven by a renewed interest in DIY culture and sustainable practices. Creating paper poinsettias offers an eco-friendly alternative to traditional holiday decorations while providing a creative outlet. Social media platforms like Pinterest and Instagram have fueled this trend, with countless tutorials and inspirations available at one's fingertips. The tactile experience of crafting, combined with the satisfaction of making something beautiful by hand, continues to attract enthusiasts of all ages. Paper poinsettias, in particular, allow for a customizable and enduring homage to a beloved holiday symbol.
Materials Needed for Paper Poinsettia Craft
Essential Supplies
Creating a paper poinsettia craft requires a variety of materials for the best results. Here is an ordered list of essential supplies:
- Red and Green Cardstock - These form the petals and leaves of your poinsettia.
- Scissors - Sharp scissors are necessary for precise cutting of intricate shapes.
- Glue - A strong adhesive like tacky glue or a hot glue gun ensures the pieces stay together.
- Pencil - Useful for tracing templates onto the cardstock.
- Templates - Pre-drawn shapes of petals and leaves to guide your cutting.
Gathering these items before you start will streamline the crafting process, allowing you to focus on creating a beautiful paper poinsettia.
Optional Tools and Extras
Enhancing your paper poinsettia craft can be achieved with some optional tools and extras. Glitter glue can add a festive sparkle to the petals, while a bone folder can help in making crisp folds for a more realistic look. Small beads or sequins can serve as the flower's center, giving it a touch of elegance. Additionally, wire and floral tape can be used to create stems, making your poinsettia an ideal addition to a holiday centerpiece or wreath. These extras can elevate your craft from simple to stunning, adding a personal touch that reflects your creativity.
Where to Buy
Finding the right materials for your paper poinsettia craft is crucial. Highlighting the best places to shop, local craft stores often carry a wide selection of cardstock in various colors and textures. For those who prefer online shopping, websites like Amazon and Etsy offer a plethora of options, including specialty papers and crafting tools. Additionally, big-box retailers like Michaels and Hobby Lobby provide both in-store and online purchasing options, often with seasonal discounts. Choosing the right supplier ensures you have high-quality materials, making your crafting experience more enjoyable and rewarding.
Preparing Your Workspace
Setting Up Your Craft Area
Creating a conducive environment is paramount for any crafting project, and making paper poinsettias is no exception. Start by selecting a well-lit space with ample room to spread out your materials. A sturdy table is essential, along with comfortable seating to ensure a pleasant crafting experience. Keep your tools within arm's reach to maintain a streamlined workflow. Utilizing storage solutions such as bins or drawers can help keep your space organized and free of clutter, enhancing both efficiency and enjoyment. Remember, an orderly and well-prepared craft area paves the way for a successful and enjoyable crafting session.
Safety Tips and Precautions
While crafting can be a delightful activity, it's important to highlight key safety tips and precautions to prevent accidents. Always use sharp tools like scissors and craft knives with caution, keeping them away from children. Consider wearing protective gloves when handling hot glue guns to avoid burns. Ensure that your workspace is well-ventilated, especially if using spray adhesives or paints. Keeping a first-aid kit nearby is also advisable in case of minor injuries. By adhering to these safety measures, you can ensure a safe and enjoyable crafting experience.
Organizing Materials
A well-organized stash of materials can make a significant difference in the crafting process. Start by categorizing your supplies: paper types, adhesives, cutting tools, and decorative elements should each have their designated spots. Clear containers or labeled drawers work wonders for maintaining order and accessibility. Consider a pegboard for hanging tools and keeping them within easy reach. This level of organization not only saves time but also reduces stress, allowing for a more creative and focused crafting session. A tidy workspace is the cornerstone of efficient and enjoyable crafting.
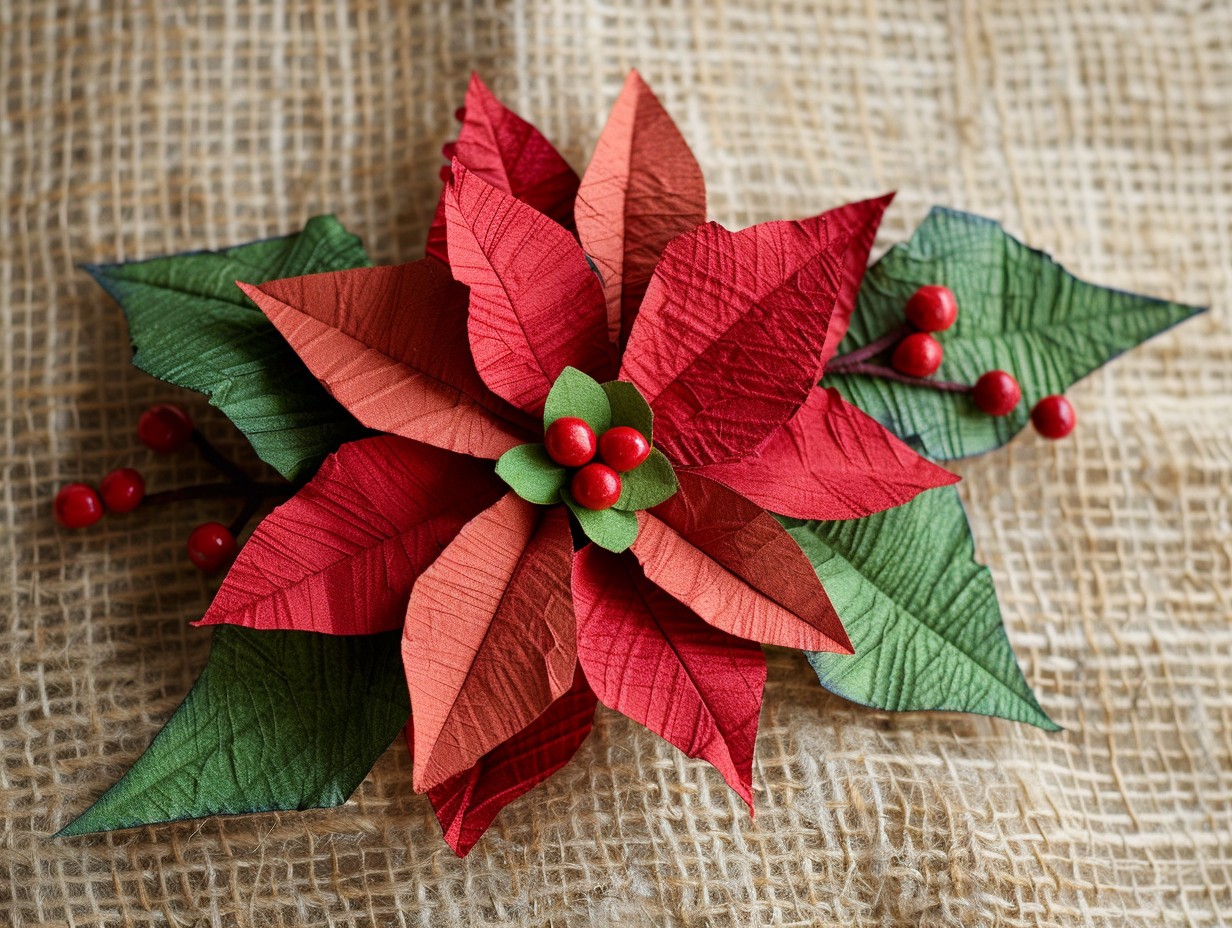
Step-by-Step Guide to Making Paper Poinsettias
Cutting Petals and Leaves
Creating the perfect paper poinsettia begins with meticulously cutting the petals and leaves. Here's a step-by-step guide:
- Select the Paper: Choose high-quality, colored paper—typically red for petals and green for leaves.
- Draw the Templates: Trace out petal and leaf shapes on the paper using a pencil and templates.
- Cutting Out Shapes: Carefully cut along the traced lines with sharp scissors to ensure clean edges.
- Varying Sizes: Cut petals in various sizes to add depth and realism to the flower.
- Final Checks: Inspect each piece for any rough edges and trim as necessary.
This methodical approach ensures each piece of your paper poinsettia is uniform and ready for the next step.
Shaping and Curving Techniques
Transforming flat paper into lifelike petals and leaves requires specific shaping and curving techniques. Begin by gently rolling the edges of each petal with a dowel or the edge of a table to create a natural curl. For added dimension, use a bone folder to score lines down the center of the petals, mimicking the veins of a real poinsettia. For the leaves, a slight pinch at the base can give them a more authentic, three-dimensional look. These small adjustments bring the paper poinsettia to life, adding a touch of realism that sets it apart from simple cutouts.
Assembling the Flower
Bringing together the individual components to form a cohesive flower is as much an art as it is a science. Begin by layering the largest petals at the base, securing them with a dab of glue at their centers. Continue adding layers, working from the largest to the smallest petals, rotating each layer slightly to fill in gaps and create a full, rounded appearance. For the leaves, attach them beneath the petals, allowing them to peek out naturally. Finish by adding a cluster of small, yellow paper circles in the center to mimic the poinsettia’s distinct central buds. The result is a stunning paper poinsettia that rivals the beauty of its natural counterpart.
Advanced Techniques and Variations
Adding Color and Texture
Paper poinsettias can be elevated from simple crafts to stunning art pieces by thoughtfully adding color and texture. Utilizing different shades of red, green, and even white can bring a more lifelike quality to your creation. Incorporating materials like tissue paper for a delicate look or using paint and markers to add intricate veining on the petals can make a significant difference. Textured paper, such as crepe or embossed cardstock, adds depth and realism, making each petal stand out. The variation in textures not only enhances visual appeal but also provides a tactile experience that mimics the natural feel of poinsettias.
Creating Different Sizes
Crafting paper poinsettias in various sizes ensures versatility for different decorative needs. Smaller poinsettias can be perfect for adding a festive touch to gift tags or holiday cards, while larger ones can serve as striking centerpieces or wall decorations. Scaling your templates up or down and adjusting the petal sizes accordingly allows you to create a cohesive look across different elements of your holiday décor. Using different sizes also provides a layered effect when arranging multiple poinsettias together, adding a dynamic and eye-catching element to your displays.
Incorporating Other Materials
Blending other materials with paper can significantly enhance the overall look and durability of your poinsettia craft. Adding elements such as glitter for a bit of sparkle, wire for bendable stems and leaves, or even small beads for the flower’s center can elevate the sophistication of your project. Felt or fabric petals can offer a soft, plush texture, while the use of metallic paper can add a festive sheen. Incorporating various materials not only diversifies the aesthetic but also opens up creative possibilities for crafting unique, personalized poinsettias that stand out in any holiday setting.
Using Paper Poinsettias in Decorations
Creating Arrangements
Transforming paper poinsettias into stunning arrangements can elevate your home decor, especially during the festive season. Arranging these handcrafted blooms in elegant vases or decorative bowls brings a touch of nature indoors. Strategically placing them on dining tables or mantels can create a warm, inviting atmosphere for guests. Pairing poinsettias with other seasonal elements like pine cones, holly, or candles can enhance the visual appeal and add layers of texture and color. For a modern twist, consider using monochromatic hues or metallic papers to craft your poinsettias, giving a contemporary edge to a traditional decoration.
Making Wreaths
Handcrafted paper poinsettia wreaths can serve as a beautiful and sustainable alternative to fresh floral designs. These wreaths, often hung on doors or walls, provide a festive welcome to visitors. Incorporating varying sizes of poinsettias in vibrant reds, whites, and greens adds depth and dimension to the wreath. Supplementing the design with faux berries, ribbons, or even small ornaments can further accentuate the holiday spirit. The durability of paper ensures that your wreath can be reused year after year, making it an eco-friendly choice for holiday decor enthusiasts.
Decorating Gift Packages
Adding paper poinsettias to gift packages transforms ordinary presents into extraordinary ones. These handmade flowers can replace traditional bows, offering a personal and artistic touch to your gifts. Using different colors and sizes of poinsettias can differentiate the packages, making each one unique. Attaching the flowers with a bit of hot glue or tying them with a ribbon ensures they stay in place while enhancing the overall presentation. This simple yet creative addition not only beautifies the gift but also shows the recipient the extra care and thought put into their present.
Troubleshooting Common Issues
Problems with Cutting
Creating a paper poinsettia can sometimes be challenging, especially when it comes to cutting the intricate shapes required for the petals and leaves. Common issues include:
- Difficulty in cutting symmetrical shapes
- Tears or rips in the paper
- Uneven edges that disrupt the overall aesthetic
- Struggles with maintaining consistent size across multiple petals
- Using inappropriate paper thickness, which can lead to unsatisfactory results
Issues with Assembly
Assembling a paper poinsettia often presents its own set of problems. One common issue is aligning the petals correctly to achieve a natural, layered look. The use of too much or too little adhesive can also be problematic, as it can lead to petals not sticking properly or becoming too stiff. Another frequent issue is the placement of the leaves, which can sometimes look awkward if not positioned thoughtfully. Additionally, the center of the poinsettia, typically represented by small paper circles or beads, can be tricky to secure in a way that looks authentic and stable.
Solutions for Common Mistakes
Addressing frequent mistakes in making paper poinsettias can significantly enhance the crafting experience and final product. Here’s a step-by-step guide to overcome typical hurdles:
- Use Templates: Employ pre-made templates to ensure uniform petal shapes and sizes.
- Sharp Tools: Utilize sharp scissors or a craft knife to achieve clean cuts.
- Appropriate Adhesive: Opt for a suitable adhesive like tacky glue to avoid mess and ensure strong bonds.
- Layering Technique: Practice layering petals from largest to smallest to create a natural look.
- Leaf Placement: Place leaves strategically, interspersing them among petals for a balanced appearance.
Following these steps can make the crafting process smoother and more enjoyable, resulting in a beautiful paper poinsettia.
Additional Resources and Inspiration
Free Templates and SVG Files
Access to free templates and SVG files can significantly simplify the process of creating paper poinsettia crafts. Websites dedicated to crafting often offer a variety of downloadable templates that cater to different skill levels, from beginners to experienced crafters. These templates provide precise shapes and sizes, allowing for uniformity and ease during the cutting and assembly stages. SVG files, in particular, are advantageous for those with cutting machines like Cricut or Silhouette, as they can be directly imported and cut with precision. Utilizing these resources not only saves time but also ensures a polished and professional-looking final product. For those looking to add a personal touch, many of these templates can be customized in design software before printing.
Video Tutorials and Guides
Video tutorials and guides are invaluable resources for anyone looking to master the art of paper poinsettia crafting. Platforms like YouTube and crafting blogs host a plethora of detailed videos that walk viewers through every step of the process. These visual aids are particularly beneficial for visual learners who might struggle with written instructions alone. Instructors often share tips and tricks that can make the crafting process smoother and more enjoyable. Watching a skilled crafter demonstrate techniques such as petal shaping, layering, and gluing can provide insights that are difficult to convey through text. Additionally, many tutorials cater to different styles and preferences, offering a range of methods to achieve the desired look of a poinsettia.
Crafting Communities and Forums
Engaging with crafting communities and forums can enhance the experience of creating paper poinsettias. These online spaces offer a platform for crafters to share their work, seek advice, and provide feedback. One member aptly noted, "The collective knowledge and support found in crafting communities can turn a solitary hobby into a collaborative and enriching experience." Participating in these forums allows crafters to stay updated on the latest trends, discover new techniques, and even participate in challenges or swaps. The sense of camaraderie and shared passion found in these communities can be incredibly motivating and inspiring, making the crafting journey more enjoyable and fulfilling.