Introduction to Bird Paper Craft
Understanding Bird Paper Craft
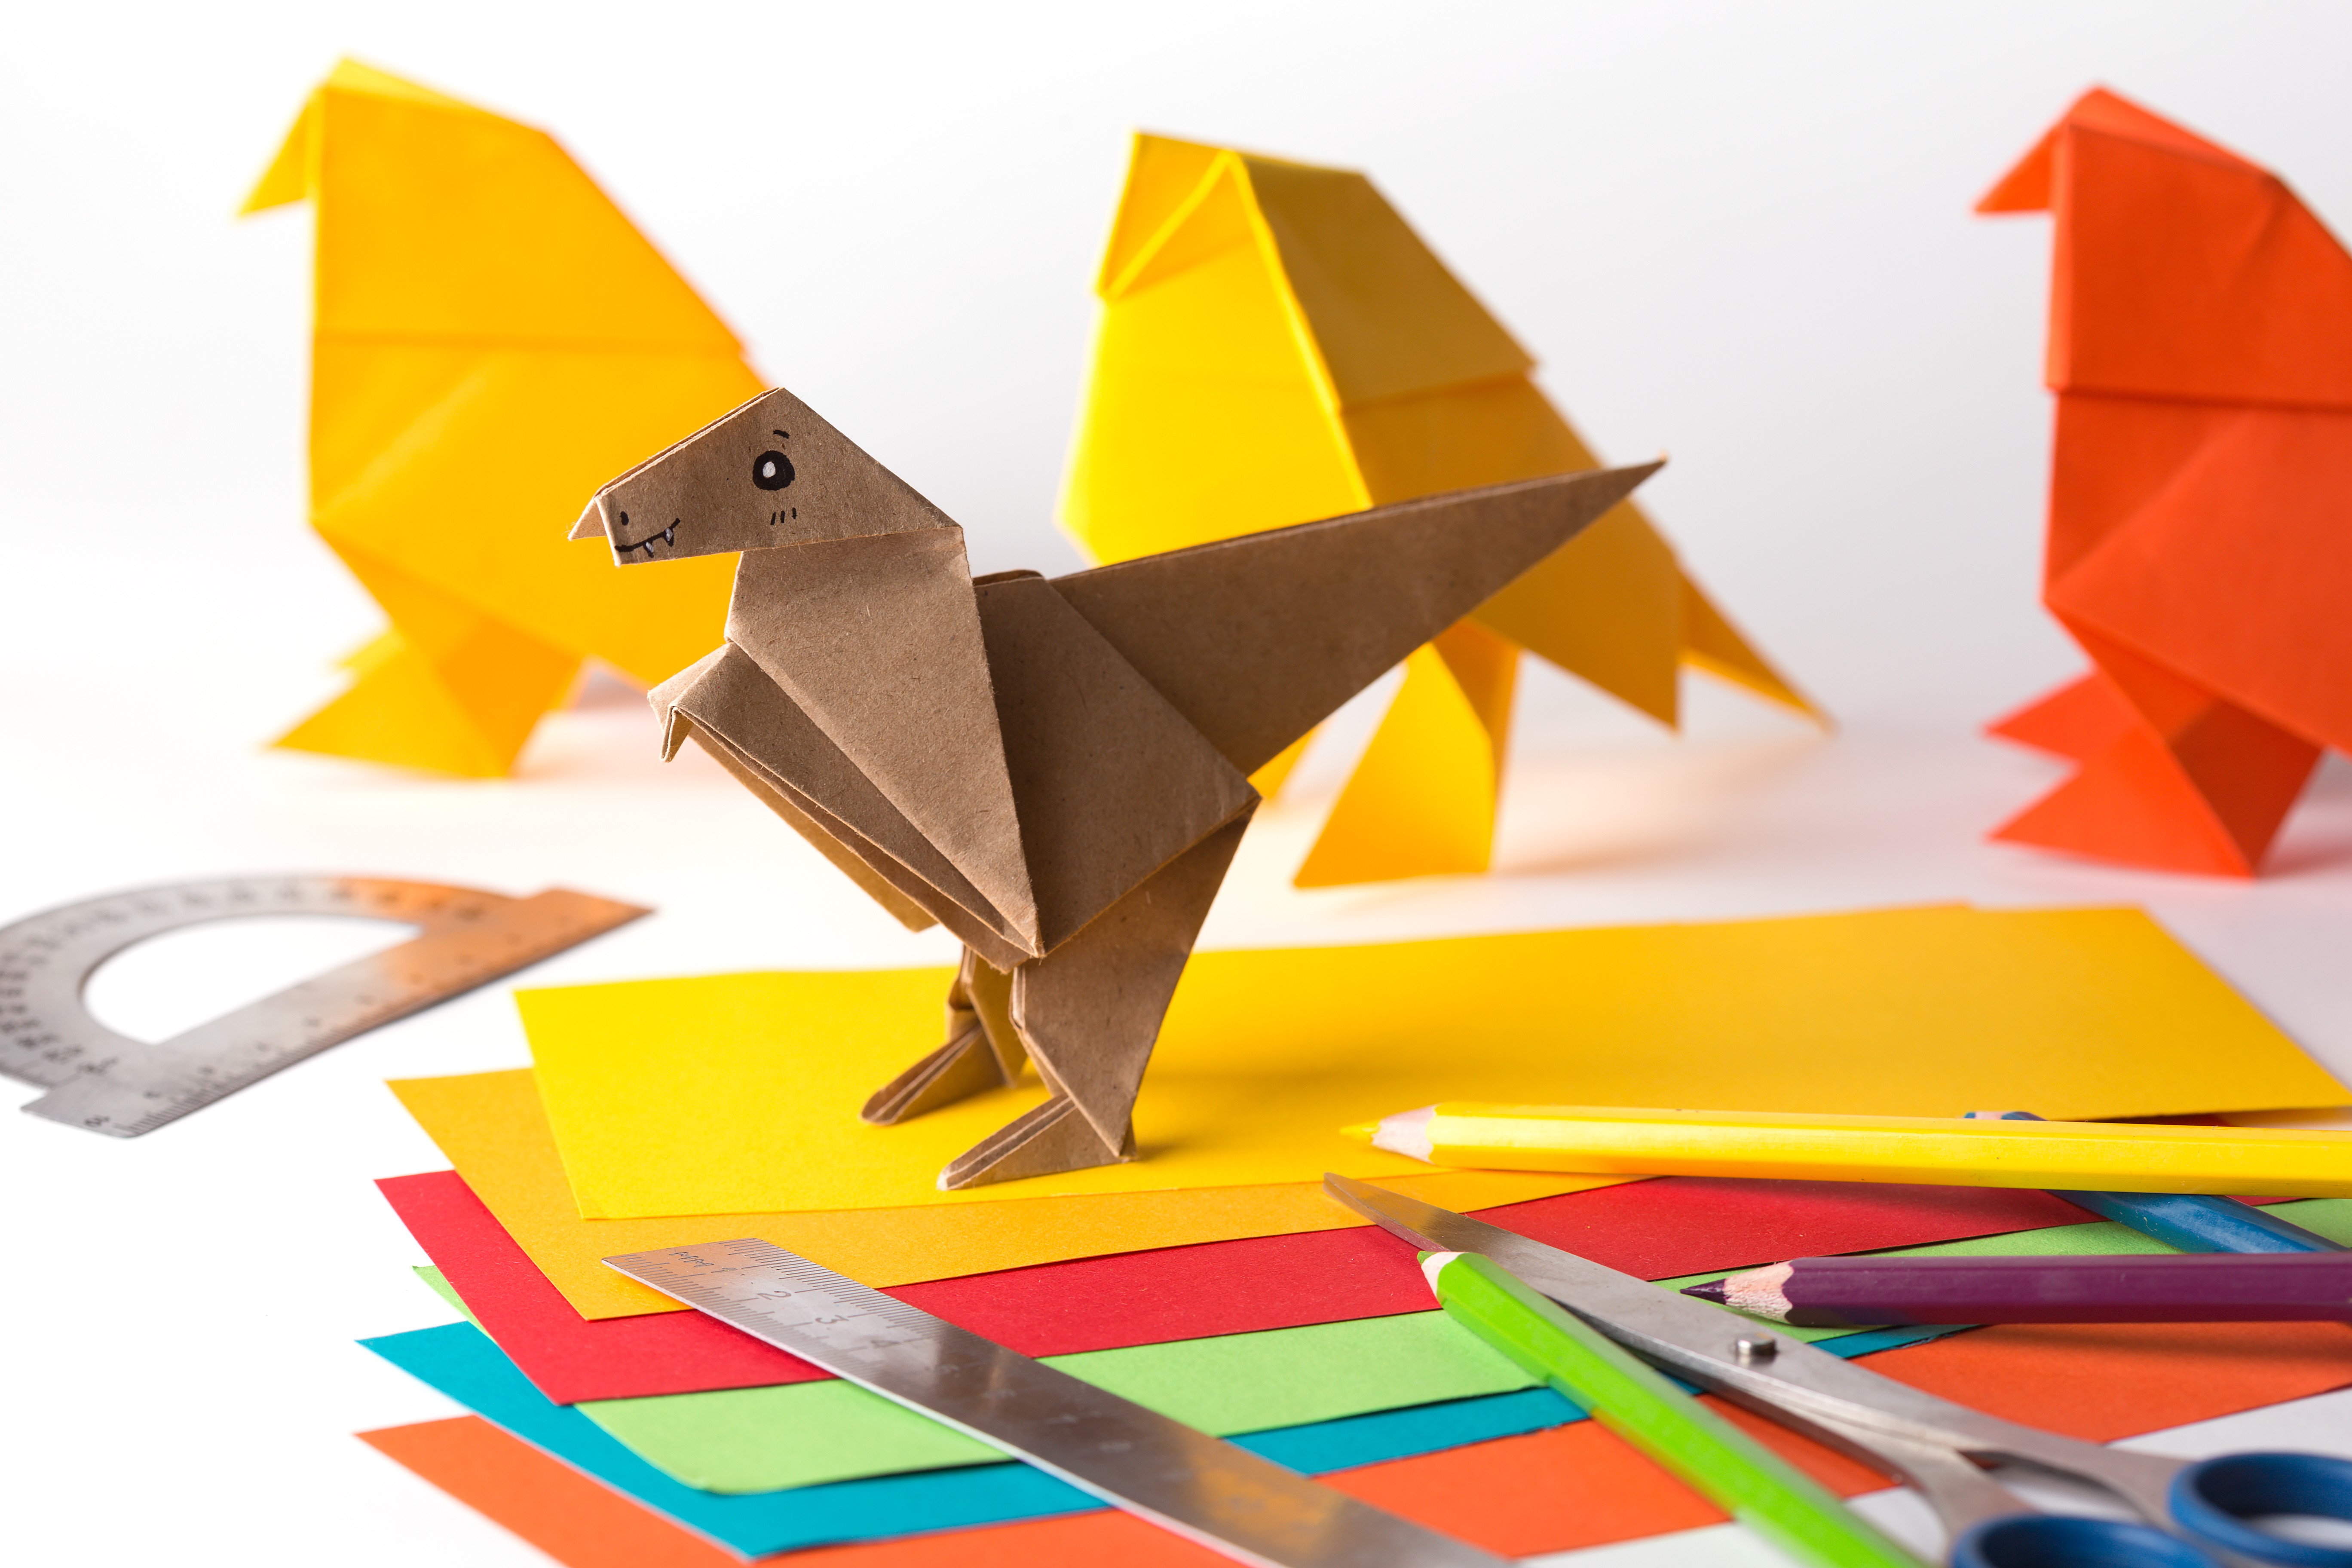
Bird paper craft is a fascinating hobby that blends artistry with nature. This creative pursuit involves crafting lifelike birds from various types of paper, including origami paper, cardstock, and even recycled materials. Enthusiasts often use intricate folding techniques and detailed instructions to bring their feathered friends to life. The process can range from simple, beginner-friendly projects to complex, multi-layered designs that require patience and precision. Bird paper craft not only allows individuals to explore their artistic abilities but also fosters a deeper appreciation for avian beauty and diversity. Whether creating a delicate hummingbird or a majestic eagle, the end result is a unique piece of art that can be displayed proudly or given as a heartfelt gift.
Benefits of Paper Craft for Creativity
Engaging in paper craft, particularly bird-themed projects, significantly boosts creativity. Studies have shown that hands-on activities like these stimulate the brain, enhancing problem-solving skills and expanding imaginative thinking. One highlight is the meditative aspect of folding and cutting paper, which can reduce stress and improve mental clarity. Crafting birds from paper encourages individuals to envision new possibilities and experiment with different techniques, leading to innovative outcomes that transcend traditional artistic boundaries. This creative process not only results in beautiful, tangible artwork but also fosters a sense of accomplishment and personal growth.
Popular Bird Paper Craft Projects
Among the myriad of bird paper craft projects available, a few stand out due to their popularity and aesthetic appeal. The classic origami crane remains a favorite, symbolizing peace and good fortune. Another cherished project is the paper robin, often crafted using colored cardstock to mimic the bird's iconic red breast. For those seeking a more challenging endeavor, the three-dimensional paper peacock, with its elaborate feather display, offers a rewarding experience. Each of these projects caters to different skill levels and provides a unique opportunity to celebrate avian beauty through the art of paper crafting.
Materials and Tools Needed
Essential Supplies for Bird Paper Craft
Creating intricate bird paper crafts requires a collection of basic supplies. High-quality paper is at the forefront—consider acid-free, lignin-free paper to ensure durability and longevity. Scissors with fine tips are necessary for detailed cutting, while a cutting mat protects surfaces and provides a stable base for precision work. For those looking to add dimension, glue sticks and liquid glue offer versatility in adhering various paper pieces. A ruler and a bone folder are invaluable for making clean folds and straight lines. Lastly, colored pencils or markers can add vibrant details, bringing your bird creations to life with personality and flair.
Optional Tools for Enhanced Crafting
While basic supplies suffice for most bird paper crafts, several optional tools can elevate your work to professional levels. Craft knives, such as X-Acto blades, enable more precise cuts than standard scissors. Tweezers help in handling small, delicate parts, ensuring placement is both accurate and neat. Embossing tools add texture to feathers, giving your birds a more realistic appearance. A self-healing cutting mat not only protects your work surface but also extends the life of your blades. Additionally, a lightbox can be a game-changer for tracing intricate designs, offering better visibility and reducing eye strain during detailed work.
Where to Source Your Materials
Finding the right materials for bird paper craft can significantly impact the quality of your projects. Highlighting local craft stores, these venues often carry a wide range of specialized papers, tools, and adhesives. Not only do they offer physically examining products before purchase, but staff are usually knowledgeable and can provide useful recommendations. For those preferring online shopping, websites like Etsy and Amazon offer extensive selections and customer reviews to guide your choices. Specialty paper shops, both online and offline, may carry unique, high-quality papers that aren't available in general craft stores, making them worth exploring for serious crafters.
Basic Techniques
Cutting and Folding Techniques
Precision and attention to detail are key when working with bird paper craft. Using a sharp craft knife or scissors, cut along the designated lines with smooth, controlled motions to avoid jagged edges. Opt for a self-healing cutting mat to protect your work surface and maintain the sharpness of your tools. When it comes to folding, score the paper lightly along fold lines with a bone folder or the back of a butter knife before making the crease. This technique ensures clean, crisp folds that add to the overall realism and structural integrity of the bird figures. Consistent practice will refine these skills, making your paper birds look meticulously crafted.
Gluing and Assembly Techniques
A steady hand and the right adhesive can make all the difference in bird paper craft. Choose a clear-drying, quick-setting glue to avoid visible stains and ensure parts adhere swiftly. Apply glue sparingly with a fine-tipped applicator for precise control, especially when working with small or intricate pieces. Use tweezers to hold and position tiny components accurately. Allow each section to dry thoroughly before moving on to the next to maintain the structure's stability. For larger models, consider reinforcing joints with small tabs or strips of paper to enhance durability without compromising aesthetics.
Coloring and Detailing Tips
Achieving lifelike coloration in bird paper craft requires a blend of artistic skill and the right materials. Colored pencils and fine-tipped markers offer excellent control for adding intricate details like feathers and shading. Watercolor paints can provide a more natural, blended look but require a steady hand to avoid warping the paper. Study real bird photos to replicate accurate patterns and color schemes. Pay attention to subtle details such as eye color, beak texture, and feather layering to bring your paper bird to life. Experiment with various techniques on scrap pieces before applying them to your final model for best results.
Step-by-Step Guide: Making a Paper Bird
Preparing Your Work Area
Organizing your workspace can significantly streamline the process of creating exquisite bird paper crafts. Follow these steps to set up an efficient work area:
- Clear a flat surface: Ensure enough space to spread out materials and tools.
- Gather materials: Collect paper, scissors, glue, and any decorative elements.
- Good lighting: Position a lamp or work in a well-lit area to avoid straining your eyes.
- Keep tools handy: Place scissors, pens, and other tools within easy reach.
- Waste bin nearby: Have a small trash bin for scraps to keep your area tidy.
A well-prepared workspace not only enhances creativity but also improves precision and reduces frustration.
Creating the Bird Body
Shaping the bird's body is the core of your paper craft project. Begin by selecting a sturdy yet pliable paper, such as cardstock. Using a pencil, sketch an oval shape that represents the bird's torso and cut it out with precision. Fold the oval in half to create a symmetrical body, ensuring both sides align perfectly. For a 3D effect, cut two identical ovals and glue their edges together, leaving a small opening to insert stuffing material like cotton or tissue paper, which adds volume and realism. The body serves as the foundation, dictating the bird's overall form and structure.
Adding Wings and Tail Feathers
Wings and tail feathers bring your paper bird to life, adding movement and elegance. Trace and cut out wing shapes from lighter paper to contrast with the body. For a layered effect, fold the wings accordion-style before attaching them to the sides of the bird's body using a glue stick. Tail feathers can be crafted by cutting elongated, tapered shapes and gluing them to the rear of the bird. Arrange the feathers in a fanned-out pattern to mimic a natural look. Attention to these details enhances the bird's dynamic appearance, making it more visually captivating.
Final Touches and Decorations
Embellishments turn a simple paper bird into a masterpiece. Use markers or watercolors to add intricate patterns and color variations to the bird’s body and wings. Small beads or sequins can serve as eyes, while tiny feathers or glitter give an extra touch of realism and sparkle. Consider adding a small loop of thread or ribbon to hang the bird as a decoration. These final touches not only personalize your creation but also elevate its aesthetic appeal, transforming it into a charming piece of art.
Advanced Bird Paper Craft Projects
Low-Poly Bird Sculptures
Transforming flat paper into geometric marvels, low-poly bird sculptures have taken the crafting world by storm. These intricate designs, characterized by their polygonal facets, offer a modern twist on traditional paper crafting. Crafters use templates to cut and fold paper into precise shapes, which are then meticulously assembled to form stunning bird sculptures. The process demands patience and precision, but the end results are strikingly elegant and contemporary. Each piece, with its sharp angles and clean lines, captures the essence of avian beauty in a minimalist form, making them perfect as decor items or unique gifts.
3D Paper Bird Ornaments
Crafting 3D paper bird ornaments brings a touch of whimsy and sophistication to any space. These ornaments, often created with layered paper techniques, add depth and dimension, making them appear lifelike. Using a variety of colored and textured papers, crafters can mimic the vibrant plumage of different bird species. The process involves cutting out multiple layers, each contributing to the final three-dimensional effect. Hanging these ornaments in a room or on a holiday tree can instantly elevate the ambiance, showcasing not only the beauty of birds but also the skill and creativity of the crafter.
Origami Birds for Intermediate Crafters
For crafters ready to challenge their skills, origami birds offer the perfect project. These creations demand a keen understanding of folding techniques and a steady hand. Unlike simple origami, intermediate-level bird designs require multiple steps and precise folds to achieve the desired effect. Patterns such as the crane, swan, and dove are popular choices, each symbolizing different cultural significances. The satisfaction of transforming a flat sheet into a complex, graceful bird is immense, making these projects highly rewarding. Displaying these origami birds can serve as a testament to one's dedication and mastery of the craft.
Common Challenges and Solutions
Troubleshooting Assembly Issues
Encountering problems when assembling bird paper crafts can be frustrating, but several common issues and their solutions can help smooth the process:
- Misaligned Pieces: Ensure all pieces are correctly oriented before gluing. Double-check the instructions.
- Glue Overuse: Apply glue sparingly to avoid warping the paper.
- Weak Joints: Use a stronger adhesive or reinforce with additional tabs if necessary.
- Tearing Paper: Handle delicate sections with care, and consider using a thicker paper stock.
- Uneven Edges: Trim excess paper carefully to maintain a clean finish.
Attention to these details can significantly improve the quality and appearance of your bird paper craft projects.
Tips for Precision Cutting
Achieving precise cuts is paramount in bird paper crafting. Using a sharp craft knife or fine scissors can make a significant difference. A cutting mat not only protects surfaces but also ensures cleaner cuts. Templates should be firmly secured to avoid shifting during cutting, which can distort the final shape. Investing time in practice can refine cutting skills, resulting in more accurate and aesthetically pleasing pieces. Consistency in cutting directly impacts the ease of assembly and the overall look of the completed craft.
How to Fix Mistakes
Mistakes are inevitable in any craft project, but they don't have to ruin the final outcome. Immediate action is crucial. If excess glue is applied, quickly wipe it off before it dries. Torn paper can be mended using a small piece of clear tape or a strategically placed patch of matching paper. Misaligned pieces may be carefully pulled apart if the glue hasn't set, allowing for realignment. Keeping a steady hand and a calm mind can help turn potential disasters into minor setbacks, ensuring your bird paper craft remains a masterpiece.
Fun Activities with Paper Birds
Organizing a Flight Show
Bringing paper birds to life through a flight show can captivate any audience, merging creativity with an appreciation for avian beauty. Meticulous planning is key to ensuring the event runs smoothly and leaves a lasting impression. Selecting a venue with ample space and natural light enhances the visibility of the intricate details on each bird. The timing of the show should coincide with natural light conditions, ideally during late morning or early afternoon.
Participants should be well-versed in the handling and display of their crafted species, enhancing the authenticity of the flight patterns. Incorporating a narrative element, such as the migratory journey of certain birds, adds an educational aspect that can deepen the audience's engagement. A well-curated soundtrack, featuring nature sounds or classical music, can elevate the experience, making it more immersive.
Marketing the event effectively through social media, local community boards, and partnerships with schools and art clubs ensures a good turnout. Providing interactive elements, such as a workshop for creating simple bird models, can also enhance visitor involvement.
Bird Species Exploration
Diving into the world of bird species through paper craft allows enthusiasts to explore the diversity and beauty of avian life in a hands-on manner. Each model serves as a miniature representation of the bird, highlighting unique features such as plumage patterns, beak shapes, and wing structures. This exploration can start with common backyard birds, which are easily recognizable and provide a good foundation for more complex species.
Detailed research on each bird's habitat, behavior, and role in the ecosystem can inform the crafting process, making it not just an artistic endeavor but also an educational one. Incorporating these details into the design helps create accurate and respectful representations of the species. For instance, studying the iridescent feathers of a hummingbird or the tufted crown of a crested bird can lead to more lifelike and intricate models.
Collaboration with ornithologists or birding groups can provide deeper insights and more accurate information. Showcasing the finished models in local libraries or community centers can foster a greater appreciation for bird diversity and conservation efforts.
Creating a Bird Mobile
Transforming your love for paper birds into a kinetic sculpture involves a few straightforward steps. Follow this ordered list to create a stunning bird mobile:
- Select Your Birds: Choose a variety of bird species to add diversity and interest. Opt for different sizes and colors to make the mobile visually captivating.
- Craft the Birds: Use high-quality paper and detailed templates to cut out and assemble your birds. Pay attention to the balance and weight of each bird to ensure they hang correctly.
- Prepare the Mobile Frame: Construct a simple frame using lightweight materials like bamboo sticks or metal rods. Ensure the frame is sturdy enough to hold the weight of all the birds.
- Attach Strings: Cut thin, transparent strings at varying lengths. Attach one end to each bird and the other to the frame. This variation in string length creates a dynamic, layered effect.
- Balance the Mobile: Hang the mobile temporarily to check the balance. Adjust the positions of the birds and strings until the mobile hangs evenly and rotates smoothly.
- Secure and Display: Once balanced, secure all knots and connections. Hang the mobile in a well-lit area where it can move gently with the airflow, showcasing the birds in flight.
By following these steps, you can create a mesmerizing bird mobile that brings the elegance of avian flight into your home.
Inspirational Ideas and Resources
Bird Paper Craft Templates and Patterns
For those new to bird paper crafting, templates and patterns are indispensable tools. These pre-designed guides simplify the process, allowing even beginners to create intricate and realistic paper birds. Templates often come with detailed instructions, ensuring that every fold and cut is precise. Patterns, on the other hand, provide the aesthetic details that bring the paper birds to life, from the delicate feathers of a sparrow to the majestic plumage of a peacock. Craft stores and online platforms offer a plethora of options, catering to different skill levels and artistic styles. Utilizing these resources can significantly enhance the crafting experience, making the process both enjoyable and rewarding.
Video Tutorials and Online Classes
In an era where digital learning has become mainstream, video tutorials and online classes offer a convenient way to master bird paper craft. These visual guides provide step-by-step instructions, making complex techniques accessible to novices and experts alike. Platforms like YouTube and specialized craft websites host a wealth of content, ranging from quick tips to comprehensive courses. Interactive online classes also offer the added benefit of real-time feedback from instructors, allowing learners to refine their skills on the spot. This mode of learning is not only efficient but also fosters a sense of community among craft enthusiasts, enhancing the overall creative journey.
Community and Sharing Your Creations
In the world of bird paper crafting, community engagement and sharing creations play a pivotal role. Highlighting the importance of this aspect, many crafters find immense joy and inspiration by connecting with fellow enthusiasts. Social media platforms, dedicated forums, and local craft groups provide venues for showcasing completed projects, exchanging tips, and seeking advice. Sharing your work not only garners appreciation but also motivates others to embark on their own creative endeavors. This sense of camaraderie and mutual support enriches the crafting experience, making it a collective celebration of artistry and imagination.