Introduction to Paper Duck Craft
Origin and Popularity of Paper Duck Crafts
Paper duck crafts have a charming history that dates back to ancient times when simple paper art forms were a means of personal expression. The art of folding paper, known as origami in Japanese culture, introduced the world to countless possibilities, including paper ducks. Over the years, this craft has evolved, merging traditional techniques with modern creativity. Today, paper duck crafts enjoy widespread popularity, not just among children but also among adults who appreciate the meditative and artistic aspects of paper folding. Social media platforms and online crafting communities have further fueled this trend, showcasing intricate designs and innovative approaches that inspire crafters worldwide.
Benefits of Crafting for Kids and Adults
Crafting, particularly with paper, offers numerous benefits for both children and adults. For kids, it enhances fine motor skills, encourages creativity, and provides a sense of accomplishment. Adults find it therapeutic, a way to relieve stress and improve mental well-being. A highlight of crafting is its ability to bring people together, fostering communication and teamwork. Engaging in paper duck crafts, for instance, can be a delightful family activity, bridging generational gaps and creating lasting memories. Additionally, the sense of achievement from transforming a simple piece of paper into a beautiful duck can significantly boost self-esteem and promote a constructive use of leisure time.
Overview of Different Paper Duck Craft Types
There is a fascinating variety of paper duck crafts that cater to different skill levels and artistic preferences. Traditional origami ducks, requiring precise folds and a keen eye for detail, remain a favorite among purists. For those looking for a more whimsical touch, quilling paper ducks, which use strips of paper rolled into coils and shaped into intricate designs, offer a playful alternative. Another popular type is the 3D paper duck, constructed from multiple pieces of paper assembled to create a more lifelike figure. These diverse styles ensure that whether one is a novice or an experienced crafter, there is always a new and exciting paper duck craft to explore.
Materials Needed
Essential Craft Materials
Creating a paper duck craft requires careful selection of materials to ensure a sturdy and visually appealing result. The primary material you'll need is colored construction paper, preferably in shades of yellow for the duck's body and orange for the beak and feet. High-quality construction paper offers durability and ease of manipulation. Glue sticks are indispensable for securely attaching various parts of the duck without making a mess. Scissors with pointed tips allow for precise cutting, which is crucial for achieving clean lines and detailed shapes. Additionally, a black marker is necessary to draw the eyes and other small details, bringing the duck to life. For those seeking a more polished look, googly eyes can be an alternative to hand-drawn ones, adding a playful touch. Lastly, having a ruler on hand ensures that all parts are measured accurately, maintaining proportionality throughout the craft.
Optional Decorative Items
Enhancing the charm of your paper duck can be easily achieved with a few decorative items. Glitter glue provides a sparkling effect, ideal for highlighting wings or adding whimsical patterns. Feathers, available in craft stores, can be glued onto the duck to give it a more textured and realistic appearance. Small pom-poms can serve as an adorable addition for the duck's tail, adding a pop of color and fluffiness. Washi tape, known for its vibrant patterns and easy application, is perfect for creating borders or adding unique designs to the duck's body. Stickers, particularly those with themes of nature or water, can be applied to the background setting of your craft, creating a more immersive scene. Incorporating these optional items not only makes the crafting process more enjoyable but also allows for greater creativity and personalization.
Recommended Craft Tools
To achieve the best results in paper duck crafting, having the right tools is imperative. A pair of precision scissors is ideal for cutting intricate shapes and ensuring smooth edges, which is particularly important for detailed parts like the duck's beak and webbed feet. A cutting mat is useful for protecting surfaces and providing a stable base for cutting. Craft knives can be employed for more complex cuts that regular scissors may struggle with. A bone folder helps in creating crisp, clean folds, ensuring that the duck's body and wings are neatly shaped. For those who prefer a more professional finish, a hot glue gun can be used for stronger and quicker adhesion compared to regular glue sticks. Tweezers are handy for placing small decorative items like googly eyes or tiny stickers with precision. Employing these recommended tools can significantly enhance the efficiency and quality of your paper duck craft.
Step-by-Step Guide to Making a Paper Duck
Preparation and Setup
Organizing your materials and workspace ensures a smooth crafting experience. Follow these steps to set up for making a paper duck:
- Gather all necessary materials: colored paper, scissors, glue, markers, and any decorative elements like glitter or stickers.
- Choose a clean, flat workspace with ample lighting.
- Prepare a cutting mat to protect your surface from scratches.
- Lay out your tools within easy reach to avoid unnecessary interruptions.
- Have a waste bin nearby for scraps and used materials.
Crafting the Duck Body
Creating the main structure of the paper duck is an engaging part of the process. Start by selecting a sturdy piece of colored paper, preferably in shades of yellow or white. Fold the paper in half to form a symmetrical base. Carefully draw the outline of the duck's body, including the head, wings, and tail. Precision matters here, as the initial cuts will define the overall shape. Use sharp scissors to cut along the drawn lines, ensuring smooth edges. Once the body is cut out, gently unfold the paper to reveal the duck's form. This foundational step sets the stage for adding intricate details that bring the paper duck to life.
Adding Details and Decorations
Personalizing your paper duck with unique touches elevates the craft. Pay close attention to the eyes, beak, and feathers, as these features significantly impact the duck's appearance. Use markers to draw expressive eyes and a cheerful beak. Adorn the wings with patterns or textures using colored markers or layered paper. Highlight the duck's body with glitter or small stickers to add a bit of sparkle. These thoughtful embellishments not only enhance the visual appeal but also reflect your artistic flair, making each paper duck a distinctive piece of art.
Advanced Paper Duck Craft Techniques
Origami Duck
Creating an origami duck can be an engaging and rewarding craft project. This traditional form of Japanese paper folding transforms a simple sheet of paper into a charming duck through a series of precise folds. The process starts with a square piece of paper, which is methodically folded to form the body, wings, and beak of the duck. Accuracy is key, as each fold builds upon the last to bring the creation to life. The final product is not only a testament to patience and skill but also a delightful decorative piece that can be used to adorn spaces or given as a thoughtful handmade gift. The simplicity of materials required—just paper and perhaps some markers for detailing—makes origami ducks an accessible craft for all ages.
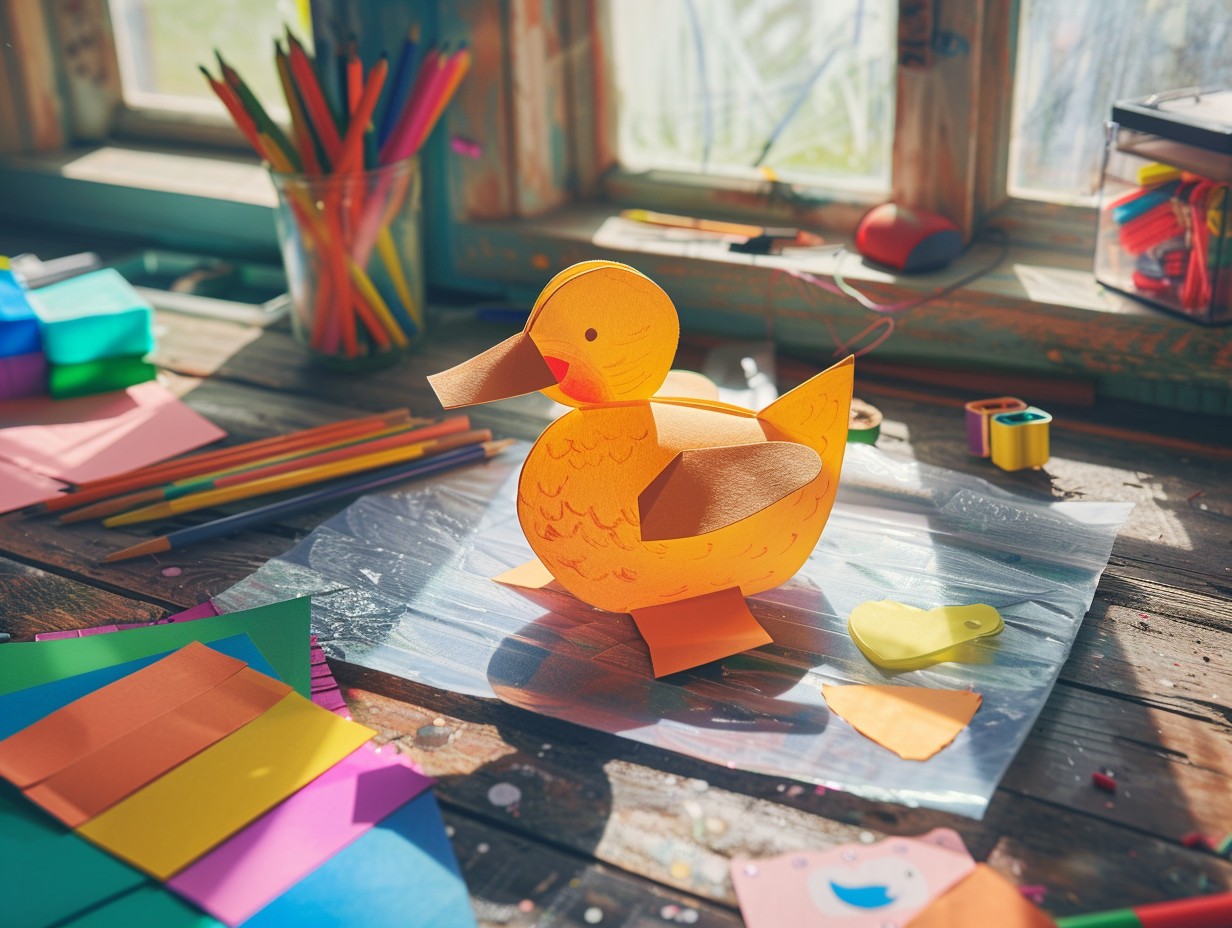
3D Paper Duck
Crafting a 3D paper duck involves a more intricate process compared to its origami counterpart. This project typically requires multiple pieces of paper cut into various shapes that are then assembled to create a three-dimensional figure. Templates are often used to ensure accurate shapes and sizes, which are then meticulously glued together. The end result is a more lifelike representation of a duck, with the added dimension offering a unique visual appeal. This method allows for greater creativity in terms of color and texture, as different types of paper and finishes can be employed. The detailed assembly process makes it a suitable challenge for more experienced crafters looking to enhance their skills and produce a stunning, realistic paper sculpture.
Using Mixed Media for Enhanced Effects
Incorporating mixed media into paper duck crafts can significantly elevate the final product. By combining various materials such as fabric, paint, and even natural elements like feathers, crafters can add texture and realism to their creations. This approach allows for a broader range of artistic expression, as different media can be layered and blended to achieve desired effects. For example, using fabric scraps for the wings can give a tactile quality, while a light wash of watercolor paint can add depth and shading. Feathers can be attached to mimic the natural plumage of a duck, making the craft piece more visually striking. Mixed media not only enhances the aesthetic appeal but also encourages experimentation and innovation in paper crafting.
Fun Variations and Themes
Seasonal Duck Crafts
Crafting paper ducks can be an enjoyable and festive activity that changes with the seasons. For spring, vibrant pastel colors bring the essence of blooming flowers and new life. Autumn-themed ducks can feature warm oranges and browns, reflecting the changing leaves. Winter-inspired ducks adorned with glitter and faux snow make for charming holiday decorations. These seasonal variations not only keep the activity fresh and exciting for participants of all ages but also offer a delightful way to celebrate the different times of the year with a creative twist.
Educational Themes
Paper duck crafts are more than just a fun pastime; they can serve as valuable educational tools. Integrating themes like biology, children learn about different duck species and their habitats, sparking curiosity and environmental awareness. Historical themes can explore the significance of ducks in various cultures and mythologies. Math concepts can be introduced by measuring and cutting the paper with precision, enhancing fine motor skills and spatial awareness. By embedding educational content into the crafting process, children gain knowledge while engaging in a hands-on activity.
Interactive Duck Crafts
Creating interactive paper duck crafts can captivate children's attention and encourage imaginative play. Here are some ideas to make your duck crafts more engaging:
- Puppet Ducks: Attach sticks to your paper ducks to create puppets for storytelling.
- Movable Parts: Design ducks with wings or beaks that can move using brads or split pins.
- Floating Ducks: Use waterproof materials to make ducks that can float in water, perfect for bath time fun.
- Sound Effects: Incorporate small bells or squeakers to add auditory elements to your paper ducks.
- Thematic Scenes: Create entire dioramas where the crafted ducks can "live," such as a pond or farm setting.
These interactive elements transform simple paper ducks into dynamic toys that foster creativity and interaction.
Troubleshooting Common Issues
Common Crafting Mistakes
Paper duck crafting is a delightful activity, but even the most enthusiastic crafters can stumble. Here are frequent pitfalls:
- Using the wrong type of paper: Not all paper is created equal. Thin paper can tear easily, while overly thick paper is difficult to fold.
- Skipping measurements: Precise measurements ensure symmetry and balance. Ignoring them leads to wonky ducks.
- Ignoring instructions: Crafting requires following steps meticulously. Deviating can result in a less-than-perfect creation.
- Overuse of glue: Too much adhesive can warp the paper and ruin the final look.
- Rushing the process: Crafting is an art that requires patience. Hurrying can lead to mistakes and a subpar final product.
Effective Solutions
Creating the perfect paper duck involves a series of well-defined steps:
- Select appropriate materials: Use medium-weight paper and suitable adhesives.
- Follow a template: Stick to a tried-and-tested template for consistent results.
- Measure and cut precisely: Use a ruler and sharp scissors or a craft knife for clean edges.
- Fold carefully: Ensure each fold is crisp and accurate to maintain symmetry.
- Allow glue to set: Give the adhesive enough time to dry before moving to the next step.
Tips for a Perfect Finish
"Attention to detail transforms a simple paper duck into a work of art. Crisp folds, precise cuts, and the right amount of glue are key. Take your time and enjoy the process; the results will be worth the effort."